Cookbook: run Hermes Agent as a Microsoft Foundry autonomous agent
Deploy Nous Research's open-source Hermes Agent into your own Microsoft 365 tenant, create it from Teams and give it its first tasks.
TL;DR. You install Hermes in your own tenant from our open-source repository, in one of two ways:
- Guided install (recommended). One installer builds Hermes in your Azure subscription and submits it to your administrator for approval. Follow Steps 1 to 7.
- Advanced route. Deploy step by step with the advanced guide in the repository, build the upload ZIP with the repository's package script, and upload it in the Microsoft 365 admin center. See "Advanced route: build and upload the package yourself".
Both routes end the same way: an administrator approves Hermes in the Microsoft 365 admin center, and employees create it from Teams.
What you'll build
By the end of this recipe, your company has its own Hermes autonomous agent: a Foundry hosted agent with its own Microsoft 365 account. You'll create an instance from Microsoft Teams, chat with it, have it send email and work with files in its own OneDrive, and schedule a recurring task that runs with nobody signed in.
Status. Autonomous agents are in preview through Microsoft's Frontier program, and this repository is a proof of concept. Use a test or pilot tenant, not production.
What you'll learn
- How to deploy Hermes as a Foundry hosted agent and publish it as an autonomous agent blueprint.
- How an administrator approves the blueprint and chooses who may create it.
- How an employee creates an instance in Teams, and what that instance gets.
- How Hermes works as its own account in Teams, email and OneDrive.
- How scheduled routines run without anyone's login.
- How to update, troubleshoot and remove the deployment.
How it fits together
Hermes runs in a single container on Foundry, alongside three small helpers. The edge receives each message from Teams, email or a routine, checks who sent it and gets a short-lived token for the agent's own account. The gateway passes the message to Hermes. Hermes reasons, then calls tools through the Microsoft 365 sidecar, which acts as the agent's own account. The AI models come from your own Foundry project.
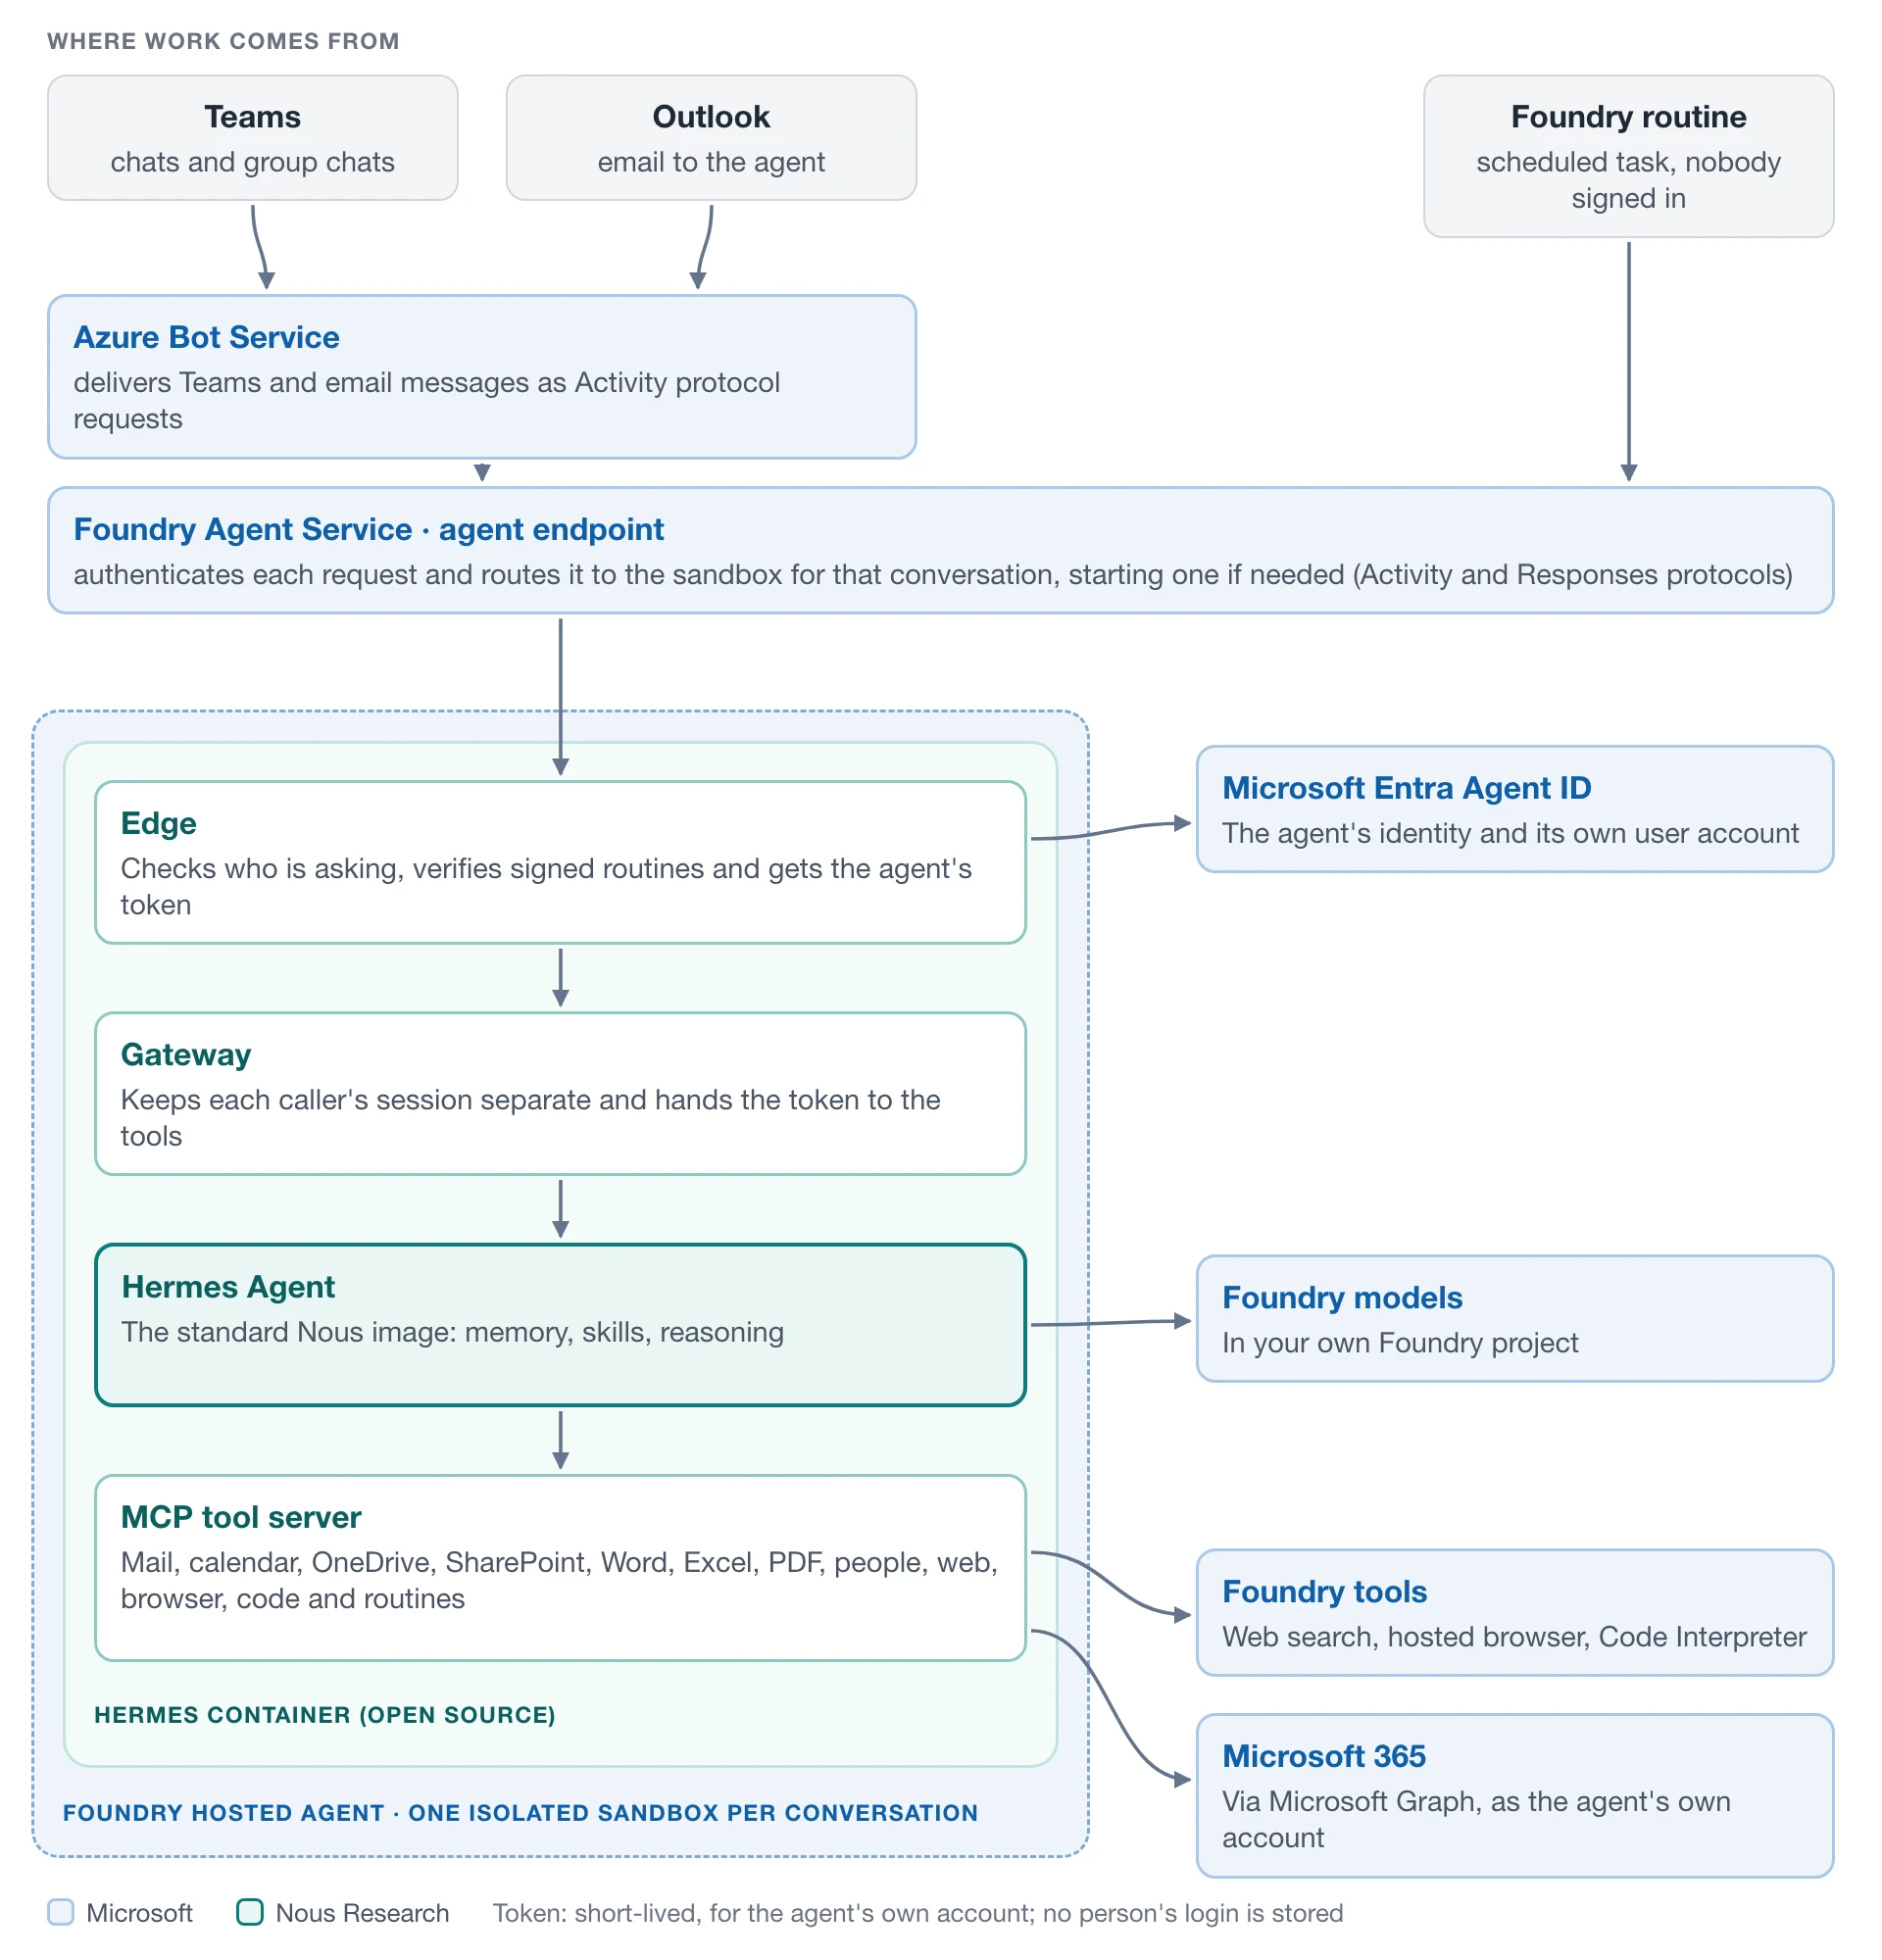
| Component | Port | What it does |
|---|---|---|
| Edge (.NET, Microsoft 365 Agents SDK) | 8088 | Speaks Foundry's Activity and Responses protocols, checks the caller and gets the agent's token |
| Gateway | 8080 | Translates each request for Hermes and keeps sessions apart |
| Hermes Agent | 8642 | The standard Hermes image from Nous, pinned by digest |
| Microsoft 365 sidecar | 8010 | Mail, calendar, OneDrive, SharePoint, document, web and other tools |
Only the edge port is exposed. The other components talk to each other inside the container.
Prerequisites
Microsoft 365
- A tenant enrolled in the Frontier preview program, with the Agent 365 terms accepted by a Global Administrator.
- At least one Microsoft 365 Copilot or Microsoft Agent 365 licence. We tested with Microsoft 365 Copilot (SKU
Microsoft_365_Copilot), assigned to the administrator who enrols the tenant in Frontier. - A free agent seat. Frontier tenants get 25 preview seats, and each created instance uses one.
- Microsoft Teams for the employees who will work with Hermes.
Azure
- An active Azure subscription in the same Microsoft Entra tenant.
- A region that supports Foundry hosted agents, with quota for the chat model.
People and roles
| Step | Who | Role needed |
|---|---|---|
| Deploy (Steps 2–3) | Deployment operator | Owner on the subscription, or Contributor plus Role Based Access Control Administrator |
| Approve (Step 4) | Tenant administrator | Global Administrator or AI Administrator |
| Connect routing (Step 5) | Deployment or identity administrator | Can register an application and grant delegated consent (a Global Administrator can) |
| Create (Step 6) | Employee | Member of the hiring scope chosen in Step 4 |
In a test tenant, one person can hold all of these roles.
Your computer
Windows with WSL (Windows Subsystem for Linux), macOS, or Ubuntu or Debian Linux, with git, curl and Python 3. The installer is a Bash script, so on Windows you run it in a WSL terminal, such as Ubuntu from the Microsoft Store. It installs the Azure CLI and the Azure Developer CLI if they are missing.
Step 1: get the code
git clone https://github.com/NousResearch/hermes-foundry
cd hermes-foundry
The repository holds the edge, gateway and sidecar, the container build and the installer. Hermes itself comes from Nous's published Docker image, pinned by digest in the Dockerfile, so there is no separate Hermes download.
Step 2: check before you create anything
Two read-only modes let you check your tenant first. Neither creates Azure resources.
./deploy.sh --validate   # sign in and run read-only prerequisite checks
./deploy.sh --preview    # list the Azure resources the installer would create
Expected result: validation passes, and the preview lists a Foundry account and project with a model deployment, a container registry, an Azure Bot with a Teams channel, a managed identity and the role assignments they need.
Step 3: deploy
./deploy.sh
The installer guides you through each stage and saves its progress as it goes. It:
- signs you in and lets you choose the tenant and subscription;
- registers the Azure resource providers and deploys the infrastructure and the model;
- builds the Hermes image in your own container registry;
- creates the hosted agent and publishes it as an autonomous agent blueprint, privately, inside your tenant;
- declares the Microsoft Graph permissions the agent will ask for; and
- installs the automation that lets each new agent schedule routines (see Step 7c).
Then it pauses and waits for an administrator to approve the blueprint. Publishing here means making Hermes available inside your own tenant. Nothing goes to Azure Marketplace or the public Teams store.
Expected result: the installer waits at the approval prompt, and a request named Hermes Agent on Foundry with the status Pending activate appears in the Microsoft 365 admin center under Agents → All agents → Requests. It usually appears within five minutes, though it can take a few hours.
If the installer stops, fix the cause and resume with ./deploy.sh --continue. Don't delete its saved progress or start a second installation.
Advanced route: build and upload the package yourself
Some organisations want to control every step and add agents by uploading a package in the Microsoft 365 admin center. Instead of running the installer in Step 3, follow ADVANCED_TENANT_DEPLOYMENT.md in the repository. It walks through the same deployment one step at a time: the Foundry project, the models, the container registry, the Hermes image, the blueprint and its Microsoft Graph permissions.
Then build the upload package from the repository. You need a 192×192 colour icon and a 32×32 transparent white-outline icon, both PNG:
python3 scripts/package-agent365-blueprint.py \
  --blueprint-id "<your blueprint ID>" \
  --display-name "Hermes Agent on Foundry" \
  --version 1.0.0 \
  --color-icon color.png \
  --outline-icon outline.png
The script writes deployment-output/hermes-agent-on-foundry/Hermes-Agent-on-Foundry.zip. It holds only the agent's manifests, the two icons and your blueprint ID, with no secrets or tokens. The package belongs to your tenant's blueprint, so it can't be reused in another tenant.
In Step 4, select Upload custom agent, upload the ZIP, then approve it as usual. In Step 5, set the Bot Based routing by hand, and continue from Step 6.
Step 4: approve the blueprint
A Global Administrator or AI Administrator approves the blueprint once. After that, anyone in the hiring scope can create an instance without further approval.
- Open the Microsoft 365 admin center at admin.cloud.microsoft and go to Agents → All agents → Requests.
- Select Hermes Agent on Foundry.
- On Publish to users, confirm Teams as a host product. Under Activate, choose who can create instances: Specific users or groups for a pilot, All users, or None.
- On Apply template, choose a policy template.
- On Accept permissions, compare the requested permissions with the table below, then select Grant admin consent.
- On Review and finish, select Publish.
| Permission | What Hermes uses it for |
|---|---|
Chat.ReadWrite | Reading and replying in its Teams chats |
Mail.ReadWrite | Reading and organising its own mailbox |
Mail.Send | Sending mail from its own mailbox |
Calendars.ReadWrite | Managing its own calendar |
Files.ReadWrite.All | Working with files its account can reach |
Sites.ReadWrite.All | Working with SharePoint sites shared with it |
User.Read.All | Looking up the people it works with |
User.ReadBasic.All | Showing basic profiles of people |
All eight are delegated permissions for the agent's own account. They set what the account may ask for; they don't share anyone's files or mail with it. Access still follows normal Microsoft 365 sharing, so the agent sees a folder only after someone shares it.
Expected result: Hermes Agent on Foundry shows as Available on the Registry tab.
Step 5: finish the setup
Back in the terminal, press Enter, or run ./deploy.sh --continue later. The installer now:
- connects the blueprint to its Azure Bot in Bot Based mode, after you complete a browser sign-in, and reads the setting back to confirm it saved; and
- checks that the Hermes version receives all traffic, and asks before enabling the hosted endpoint if it is disabled.
An enabled endpoint still scales to zero when nobody is using it, so you pay for compute only while sessions are active.
If your tenant blocks the automatic routing step, set it by hand. Open https://dev.teams.microsoft.com/tools/agent-blueprint/<BLUEPRINT_ID>/configuration, using the blueprint ID the installer printed. Set Agent Type to Bot Based and Bot ID to the same blueprint ID, save, and reload the page to check the change stuck.
Expected result: the installer reports that routing is verified and the endpoint is enabled, then asks about your first instance.
Step 6: create your first Hermes
- In Microsoft Teams, go to Apps → Agents for your team.
- Select Hermes Agent on Foundry, then Create instance.
- Enter a name (up to 32 characters), an alias and a domain, confirm the manager, and select Create.
Administrators can also create instances from Agents → All agents → Hermes Agent on Foundry → Create instance, which lets IT choose the name and the owner.
Each instance uses one agent seat and gets its own agent identity and agent user account. Microsoft provisions it in the background, and the mailbox and OneDrive can take a little longer than the account itself, so give them a few minutes before you test them.
Expected result: the new agent starts a Teams chat with you and appears in the org chart with you as its manager. Give the installer the instance's email address, and it confirms that the instance belongs to this blueprint.
Step 7: put it to work
Try these prompts in your Teams chat with the agent, in order. The first ones only read; the later ones change things.
7a. Check who it is
What's your name, and what's your Microsoft 365 email address?
Expected result: it gives its own address, not yours.
List up to three files in your own OneDrive. Don't change anything.
Expected result: a short list, or a plain statement that the folder is empty. A 404 error on a new instance means the OneDrive isn't ready yet; wait a few minutes and ask again.
7b. Write, share and send
Create a file called hello.txt in your OneDrive containing 'Hello from Hermes', then read it back to me.
Share hello.txt with me and email me the link.
Expected result: the email comes from the agent's own address, and the file is shared from the agent's own OneDrive. Now email the agent from Outlook: it replies from the same address, and if the same email arrives twice, it answers once.
7c. Schedule work for when nobody is around
Every weekday at 8:30 my time, summarise the new email in your inbox and send me the summary.
Only the agent's owner can create routines. Hermes sets up a Foundry routine with a signed record of its owner, its agent and its exact task, so nobody can change the task later. When the routine fires, the edge gets a fresh token for the agent's account through Microsoft Identity Web's agent user flow. No one's login is stored anywhere.
List your routines.
Delete the routine you just created.
Expected result: the routine appears in the list and is gone after you delete it. A brand-new instance can take 5 to 10 minutes before it can create routines, while the automation from Step 3 grants it access to the Foundry project.
7d. Work with a colleague
An agent with its own account hears from more than one person, so it follows three rules. Its owner can use all of its tools. Colleagues can ask it questions, but it touches its files, mail or calendar for them only with the owner's permission. People outside the company get no reply.
Let Alex read the files in the Invoices folder.
Expected result: Hermes shows you exactly what will change: who gets access, to what, and until when. Nothing happens until you reply "Yes". These checks run in code on every tool call, outside the AI model, so a clever prompt can't talk its way past them.
Ship a new version
Every Foundry agent version is immutable. To ship a change, build a new image, create a new agent version from it and move traffic to that version once you have checked it. To roll back, move traffic back to the previous version. The calls are in Microsoft's guide to managing hosted agents.
Conversations stay on the version they started with. To see new code, start a new conversation, or let old sessions time out (after 15 minutes of quiet by default).
Troubleshooting
| What you see | Likely cause | What to do |
|---|---|---|
| The request doesn't appear under Requests | Publication is still propagating | Wait. It usually appears within five minutes, occasionally hours. Don't publish a second copy. |
| Create instance is missing in Teams | The tenant isn't in Frontier, the blueprint isn't activated, or you're outside the hiring scope | Check Frontier enrolment, activation and the hiring scope |
| Hiring fails with a licensing error | No free agent seats | Free a seat or ask Microsoft for more |
| The agent never replies in Teams | The blueprint isn't set to Bot Based, or the endpoint is disabled | Run ./deploy.sh --continue, or repeat Step 5 by hand |
| Email to the agent gets no reply | The endpoint uses BotServiceRbac authorization | Use BotServiceTenant, as the installer does |
| OneDrive or mail returns 404 on a new instance | Microsoft 365 is still provisioning | Wait a few minutes and retry before changing permissions |
| OneDrive or mail returns 404 after a release | Publishing reset the blueprint's Graph permissions | Declare them again with scripts/configure-blueprint-graph-permissions.sh |
| Creating a routine fails with 403 | The new agent doesn't have the Foundry User role yet | Wait 5 to 10 minutes, and check that the routine automation is installed |
| New code doesn't seem to run | The conversation is still on the old version | Start a new conversation, or stop the old sessions |
Clean up
- Remove created instances, then the blueprint, in the Microsoft 365 admin center under Agents → All agents. Deleting Azure resources doesn't remove the instances people created.
- Remove the routine automation with
scripts/remove-agent-rbac-automation.sh, then delete the Azure resources withazd downfrom the repository folder. - Each agent's mailbox and OneDrive are Microsoft 365 data. Review and remove them separately, in Microsoft Entra and the Microsoft 365 admin center.
Next steps
- Read the article for why we gave Hermes its own identity.
- Overview: autonomous agents in Microsoft Foundry (Microsoft Learn)
- Quickstart: build your first autonomous agent (Microsoft Learn)
- Hosted agents in Foundry Agent Service. learn.microsoft.com/azure/foundry/agents/concepts/hosted-agents
- Manage hosted agents. learn.microsoft.com/azure/foundry/agents/how-to/manage-hosted-agent
- Running Hermes fleet across a whole company? Hermes Enterprise